
Goal
Not sure how to do a file upload in the Customer Data Platform? Learn how the Mobile Marketing Cloud can help you transform your data into profiles, create relevant segments and start sending from the Mobile Marketing Cloud!
Product
- Mobile Marketing Cloud
Steps
Build Your Audience
The foundation of great marketing is a clean, up-to-date list of engaged contacts and customers who have given you permission to send them campaigns. This starts by uploading all your data into the Customer Data Platform. This can be done via a CSV / Excel upload or via a live API connection with your data system(s). In this article we will explain how to upload a CSV / Excel file.
Import New Contacts
Prepare your document for import:
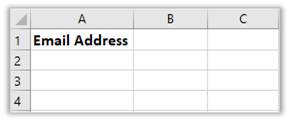
Note: Make sure to not use spaces for the labels in the first row
1. Open your blank worksheet in a spreadsheet program like Excel or Google Sheets.
2. Create and label a column for Email Addresses. This is the only field we require
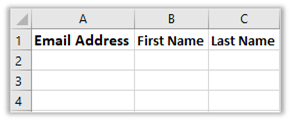
3. Next to your Email Address column, create and label additional columns for first names, last names, and any other information you want to import to the CDP.
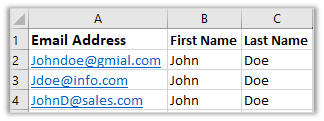
4. Paste your contacts information into the relevant fields in the spreadsheet.
5. Save your file as a CSV file or just as an Excel file. These options can usually be accessed from the file menu in your spreadsheet program.
Please note that in the Customer Data Platform we require additional formatting for dates and mobile phone numbers.
Date format: ISO8601 https://en.wikipedia.org/wiki/ISO_8601. For example, 2022-09-27.
Mobile phone number format: always format with a "+" / a country code / and spaces. For example, +31 6 12345678.
Import to the Customer Data Platform
Importing new data is done in 2 steps. First you have to create a new source and then you have to fill this source.
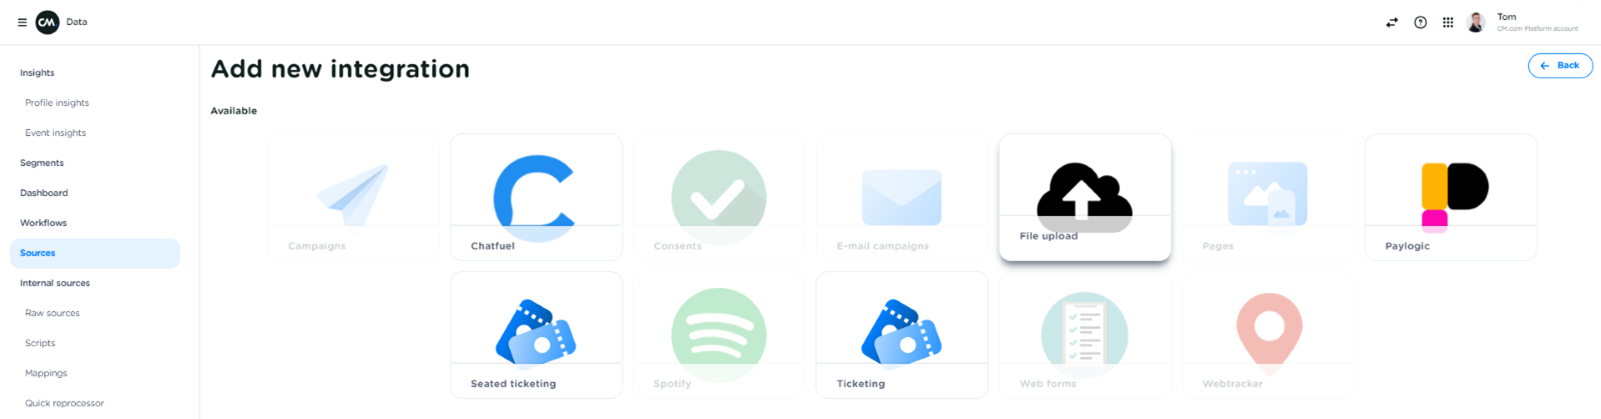
To create a new source follow these steps:
- Open the Customer Data Platform.

- Click on 'Sources'
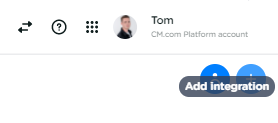
- Click on ‘Add new integration’
- Click on ‘File upload’ to import your CSV.
You have now created a new source. It must, of course, be filled with customer data. This is done by completing the following 4 steps.
Upload your CSV
- Select a CSV file by clicking on ‘Drop or upload a CSV or Excel file’.
Once uploaded, click on ‘Continue to Match’.
- Match the columns in your file to profile fields in the CDP. If the column selected has a blue checkmark, this means that it recognizes the name of the column with one of the profile properties and will map it accordingly. If you do not map the column with a profile property, it will still be shown in Event Insights.
In the screenshot below you can see that the fields email and item will be mapped to a profile property. The other columns will be uploaded, but will be shown only in Event Insights. If you do not want your data to be uploaded in the Customer Data Platform, please delete it from your excel file.
Click on ‘Continue to Organize’ when all necessary properties are matched.
- Give your import a name and select a consent Event if you want to generate an additional consent event next to the upload event. If you don't want this, just don't check the box. Click on ‘Continue to Review’ to go to step 4.
If you would like to setup a consent event belonging to this import, click the consent checkbox and select a consent category. When you have selected a consent event, more options will pop up:
- Consent location: the URL/place where the end-user gives their consent. For example: www.cm.com
- Consent text: the specific text that the end-user agrees to. For example: I agree with the Terms & Conditions.
- Consent value: either true or false.
- Date of event: the date/time when the end-user agreed to the conditions. This can be for example the purchase date of a ticket.
Please note that you always have to select one of the key properties in order to upload your consent correctly. This means that you always have to select either a mobile phone number property or an e-mail address. This is also dependent on what your key properties are.
Furthermore, you can also set a fixed value in the dropdown. This means that the data will be the same for everyone in the file upload. For example, if you know that everybody in your file upload agreed on the T&C on your website, you can set the URL of the website as a fixed value.
If you filled in all the necessary dropdowns you're all done! Click on ‘Continue to Review’ and your file will be uploaded and your data can be found at Event Insights.
- Review your import, if everything is ok click on 'Import now' to finish your import.
Create Your First Segment
When you have gathered the data into the Customer Data Platform you can start using the segmentation tool within the CDP. It allows you to use the contact information you have to create and send targeted campaigns. You can create segments of your audience based on almost any criteria you can think of, like sign-up form data, clicks on emails, nationality, age, and other information collected by the Customer Data Platform.
In this example we will create a segment of the file upload that you just did.
- Click on Profile Insights.
- Click on 'Create Filter'
- Fill in the filter cause. If you want to select everyone in your file upload, scroll all the way down to the Event filters and scroll to the name that you gave to your file upload.
- Click on the file upload you just created and click 'Apply' to show all profiles belonging to this filter.
- Click on ‘Save as segment’ in the top right corner to save your segment and give your segment a name.
Your segment is created and can be found at the ‘Segments’ tab. Here you can find an overview of all segments that you have created and saved. Before segments can be used to communicate with, they have to be synchronized with the address book.
Synchronize your segment to the address book
- Click on the ‘Segments’ tab.
- Click on the 3 dots behind the segment.
- Click on ‘Synchronize to address book’
Your segment is now synchronized with the address book and can be used in your campaigns.
Create Your First Campaign
Once your list and segments are set up, you can start building your first campaigns. Within the Mobile Marketing Cloud you can send campaigns via email and SMS.
Newsletters and triggered campaigns
Video
Below you can find a video on how to do a file upload in the CDP within Mobile Marketing Cloud.